 Regular maintenance of a vehicle can become pretty expensive, as there are oil changes, replacement of tires, replenishment of various fluids, and of course any repairs that might arise. If you’re looking to save some money on car or truck maintenance, then one way to save is to perform certain services yourself. You don’t have to be an expert in mechanics to perform certain tasks, and in fact, just about anyone who is interested can perform minor maintenance duties like oil changes, change tires and even flush their transmission or radiator. If you are interested in flushing the radiator in your vehicle but you’ve never done it before, then here are step-by-step instructions:
Supplies & equipment
Phillips head screwdriver
Wrench
Cloth rag
Pre-mixed radiator flush mixture
Coolant
Funnel
2 containers for storing used coolant
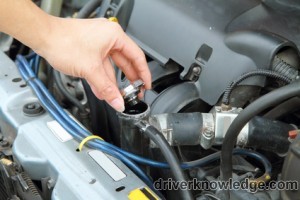
Step # 1 – the first thing that you want to do is ensure that your engine is cool to prevent becoming burned. Once the vehicle is cool, you will need to locate your radiator’s drain plug, which is how you will drain the old fluid from your radiator. If you’re unsure where to find the plug, then you can refer to your vehicle’s owner’s manual. When you’re ready to pull the plug, grab the container that you will use to put the used coolant in and place it underneath the plug. Next, remove the plug, using either your screwdriver or wrench, and allow the coolant to drain into the container.
Step # 2 – after all the old radiator fluid has drained out, replace the plug and then remove the radiator cap. Open the radiator flush mixture and pour it into the radiator, and then fill the remaining space in the radiator with water. Replace the cap, ensuring that it is on tight.
Step # 3 – start your vehicle and allow it to run for a while, until it reaches its normal operating temperature. After the normal temperature has been attained, turn on the heater and allow the car to run with the heater on for approximately ten minutes. After ten minutes, turn the heater and the car engine off and allow it to cool.
Step # 4 – make sure that your engine is completely cool by checking the radiator itself, or either the cap. If either is too hot to the touch, then allow the car to cool longer. Once it is completely cool, you will need to allow the radiator flush fluid to drain out into the second container, so again, put the container underneath the radiator and then pull the plug.
Step # 5 – after all the solution has drained out, the last step requires that you simply replace the plug and prepare to refill your radiator with new coolant. If your radiator coolant isn’t pre-mixed, then when you pour it into your radiator, you will need to mix it with half water. After you’ve filled your radiator with clean fluid, then all you have to do is replace the cap and you are all set! No need to spend unnecessary time and money at the garage.
So if you are interested in performing certain maintenance tasks on your vehicle, in order to stop paying huge amounts to your local garage, then you can easily learn to perform certain tasks like flushing the radiator of your vehicle. As you can see, it’s extremely easy to flush your own radiator and save on your maintenance expenses. Not only can performing your own maintenance save you a great deal of money, but it can help prevent you from waiting for hours in a busy garage while someone else services your vehicle.